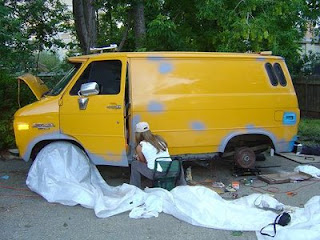
I've been lucky enough to have three specific awesome friends who understand that I am in need as I have to finish the body before moving towards the end of August. They have come out and have lent me a hand and I love them dearly :* (This probably wouldn't have been finished in time had they not helped me out, so le't hear it for friends!!).
Here are some pics!!

above: My friend working away, removing rust.


above: although I am going to use the $50 paint job technique using a roller, I've sprayed the matching color behind the bumper before putting the new one on. It's much easier to spray the cracks and tight areas now.
That chrome bumper is the one that I salvaged from my black '81 van before having it towed away.

above: The bumper is on with only two bolts for the moment. I'm hoping that when the others are in, the whole thing will straighten itself out.


above: A small dent......can't really be seen unless you get down on your knees so I'll let it go; again, time is of the essence here.

above: This back corner was rotted out pretty badly; I cut a lot away. A while ago, I bought a primed hood from a guy and low and behold, he even had a replacement piece for this very corner. The replacement panel was for a full size van and not a stubby but I cut and trimmed it and bondo'd the crack. I used a rivet gun to attach it..........I am not a pro and I really don't mind the rivets being visible so this is the finished product.

above: Here's what my weekend has in store.....the windshield is coming out and the overhead visor is temporarily coming off to get to these repairs. I have a much newer winshield with no cracks that I picked up for $50 around X-Mas time.
I've been collecting everything I need to build my van, hoods, windshields, taillight covers, old shcool grilles, radical headlights. All I need now are flares or those chrome trim pieces around the wheel wells that the conversion vans have...........anyone know where to get them?
Let me know, please :)

above: A bad spot to be repaired this weekend.

above: I bet you're wondering what the heck this crap is!?!? This is how I repaired this section on my first van. This is the bottom side of the van on the driver's side between the driver's door and the back tire; This spot always rusts out. I cut and remove a big strip here because it makes it easier to have access to clean out what lies behind. After cutting and grinding and cleaning and rust converting, I duct tape these sections and then fill it with expanding foam and then cover the holes so that the whole area is covered. Leave this to dry over night and by the next day, it should be dry. Make sure to put paper behind the duct tape where it doesn't stick to the van. Once you remove the tape, the foam will have expanded and all you have to do it shave the foam back and then fill it with body filler. The foam has little bubble holes so the bondo gets in to those holes and sticks well. Now you just have to fill it in and sand it smooth. I'm not going to bother putting in the lip on the underside, it's way easier to skip it and most people won't even notice. I have no plans for running boards ever anyways.

above: My neighbours thought that I was crazy the first time I did this and my current neighbours feel the same way. :p
Note all of that rusty crap that came out from inside and behind the cutaway section. This is a great way to clean that spot out.
I'm telling ya; this works and saves a lot of time and sanding. ;)

above: I forgot to flip this image so rotate it once clockwise and you are looking at the front of my van as it looks right now with the hood open. I had some down time to kill so I began fitting the old shcool one piece chrome grille to the van. I had to remove over an inch from the nose of my '95. The hardest thing will be getting the lights to fit. The old grilled is set up for circular lights, which look so cool!! The circles that you see here for the headlights don't line up with the circles on the grille; so.............because I need to be able to adjust and aim my headlights, I am going to cut the headlight hole section right out on the van, align them and then re-attach them with a bracket or a sort. This will totally work and will be awesome, more on this later.

above and below: The guy who developed the $50 paint job technique used it on his charger and Beatle. These are the kinds of results that you can expect when done properly.


My Van, to be continued...............................

No comments:
Post a Comment