Wednesday, December 24, 2008

Santa drives a Chevy van...............


Howdy bloggers and vanners!!
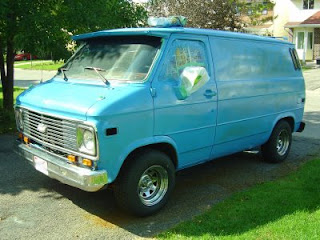
Just a quick update before X-Mas. It's been cold and snowy, just the way it should be for this time of the year. The white van is out of my possesion for a the holidays. Before it was picked up, I managed to get the rear flares installed as well as the carpet panels on the side cargo doors. All that is left is the CD player, the panels on the front doors and the installation of the front flares and downspoiler. I'm concerned that the downspoiler will act as a mini plow and may get damaged so if there's no time left for something, it will be this.
You may have noticed my new custom van up above, let me tell you, it sure is sweet!
A friend of mine took some pictures while on vacation. He got some juicy pics of the Chevy van that they used in the movie. "Scooby-Doo". I think it was "monsters unleashed" which is the second one but don't quote me on this stuff. Anywho, it's a fully customized short box Chev/GMC van and it looks awesome. There have been many, many Mystery Machines however, this one is authentic........
***********Many thanks to 'The Big C' for these shots.


Above: Though he was asked, this guy in the shot wouldn't move.....he wouldn't even respond....that's pretty rude ;)


Above: Custom front end looks great! Love the mesh behind the grille!


Above: Scooby poses with his favorite ride. I find it odd that this van has roof racks on it.....fair enough though as the original one did too. It's just that roof racks on a van like this don't usually do much for it but, for some reason, they seem to work well for this beast.
__________


So my van is officially off the road :(


I stopped driving it as soon as the salt came out. I just couldn't see the point of salting it up just to store it for 2 years. I also failed the third part of my emmissions test, they say it's the cats (fair enough, they've been on there for a while), but what's the point of putting the money in to it now just to store it? It just means that I'll have to get it all done later when I bring it out again. I did get a 12V 'aoooogha!' horn as a birthday gift last week!! I'm pretty happy about that!
Well, I have to sign off now so I'd like to wish you all a very Merry Christmas and Happy New Year!!! Stay safe on the roads, don't drink and drive and remember: "seatbelts save lives" so buckle up!!!!
Heavy Chevy :)


__________________________________________________________________________________________________________________________________

Above: My new custom van.....I crashed it.............straight in to my mouth ;)


Friday, December 5, 2008

Almost done.....................

Ladies and Gentlemen, Boys and Girls, the white van is almost finished.


The interior carpet tile/checker board idea has turned out beautifully, I'll use this technique again.
Any staples visible will be removed..they were there while the glue dried.


Me, looking cool by the newly crafted interior.


I installed a trim piece on the side barn doors to give it a complete look.


The stripe over the louvers came out well and looks deadly!!!

All it needs now is for the flare kit to be painted and istalled, the CD player to be put in, front door panels and speakers to be mounted and side door panels to be fabricated and installed. It doesn't seem like much but it sure takes a freakn' long time!!


Speaker grilles will be purchased and installed on these Pioneers. There are matching 3 1/2's for the fronts which will go on the doors. The ropes keep the doors from swinging all the way open.


As I was installing the trim piece for the carpet at the rear doors, the drill snagged some carpet and tore some of the seams out.....I was bummed about this but I came up with a fix. I cut the section out and added some more fun furr giving it a 'hairy butt crack' look........it actually works and looks good.


A little custom work done on the tail lights using that stick on Chrome trim from Canadian Tire . I used it around all of the marker lights as well.


I'm taking a break this weekend while the van gets a full rust proofing/undercoating.


I've given the flare kit their first coat of paint but they will need one or two more before I can install them. They also will have to dry out in the cold garage before installation.....should happen next week. Body kits and flare kits are amazing things; they completely transform the look/shape of a car. This van looks great right now but once that kit goes on, it will level up and maximize it's HP points!!! This thing looks like a super hero van to me. I picture it exploding out of a secret garage and fish tailing around a corner and motoring off to save the day!


After pulling the van out of the garage, here is how it looks in the garage........flares waiting for paint......lumber and garbage.....tools all around....if only I had my own workshop let alone my own garage. Big thanks to my folks for letting me take the garage over for this project. I'm with them for X-Mas and then I will be moving to Whitehorse, Yukon where who knows what vehicle awaits me there?..........


Wednesday, November 19, 2008

Slow and steady wins the race..


Howdy folks! I know.....it's been far too long since my last entry. I try to do an entry every week but sometimes it just doesn't work out that way.

The paint is all done on the white van....the stripes are on, all accesories are back on, the chrome grille is on, the chrome exaust tip is on, she's had a wax job.....I'm just waiting for my friend's flare kit to arrive.

I've been working like a dog on the interior. It has been tons of work even though my back is feeling it.


My idea for this one was to go with carpet tiles and to do a checker board interior. I found my friend some carpet tiles at a good price on www.kijiji.ca as well as some speakers. I've been having some super long days working on this interior. Luckily I've had the CBC on the radio to keep me company, (although, for a guy who doesn't often listen to the news, I'm starting to think that the world is falling apart). You know it's tough times when you hear that Whitehorse can't afford to recycle and GM is ready to crash and burn...sigh....at least I still have custom vans.


Anyways, My back is sore from getting in and out of the van all day long and from installing each individual piece of carpet in this van and I'll tell you one thing, I 'aint getting paid enough for this one. I wonder what west coast customs or 'gas' would charge for an interior like this? I'd guess something in the range of $3000 or more, probably more. For the most part it's enjoyable but I really can't wait to get this done so that I can hand it back over to the owner and regain my life.


I even made a video to show you guys the interior but when I played it back just now I realized that there wasn't enough light and that you can't really see anything so for now, you will all have to settle for pictures.....I'll try to do a video tomorrow.

More pics to come and I promise to update more often.

Tah tah for now.

Keep on Truckn'!!

:)
PS: Ok, so here is the video......I think it's too dark though.....oops!


Saturday, October 25, 2008

Watch out for a white van!!!!


Ok, so, as promised, here is a look at my friend's new van. It is a 1993 G10 Chevy van shortbox cargo van with 81,000 original miles on it. This thing is in superb shape, no really, it is very nice. My friend is a lucky guy to have such a nice machine. I really can't get over it, there is almost no rust on it.


So I immediately began painting this beast, (again with the $50 paint job method), because the weather is starting to change. It is staying white but is getting a nice fresh coat. After that it will have blue stripes of a sort of it down the hood. The same blue used on my van will be the color of the stripe so infact, it could be that this van will be the opposite of my van. The headlight housings will be white and it will get a nice chrome aftermarket grille to remind everyone who sees it that it is a wicked van and demands respect.

From my friend's old van, which was my first van (the orange one), we salvaged the spoiler, my original tear drop windows, the overhead valiance, the back door louvers and some other little things. All of the accessories will be painted white. I've painted as much white on this van as possible, so that it doesn't look like a cargo van. In the end, once the add-ons are on it, it won't look like a cargo van. It will most likely end up with a flare kit and a downspoiler....it's just a matter of finding some second hand if possible. The ones that I had were from my old van so I kind of got lucky because I wouldn't have been able to afford what they charge for them new ;)


I've had to pull the van in to the garage and to the rolling there. It's a tight space to work in but it stays much warmer in there; without, I wouldn't have been able to paint this van at all. Already, I'm worried that it will be too cold to paint once it's time for the stripes, we'll see. I'm hoping to get the last of the white put on tomorrow because after that, the weather is looking to be getting chilly for days to come and it may not get better. I've done a little bit of spray painting on the spots that need to be cleaned up. The spray will help achieve a unifrom coating faster and right now I need all the help I can get if I'm going to get this done before it's too late.


I had an impossible time getting the emblems off before paiting; actually, I didn't get them off. I couldn't let myself get stuck on them as I knew cold was coming so after an hour of failed attempts, I decided to go with plan B: leave them on, paint them and then remove the paint on the very top surface of the chrome. I even brushed a little bit of "PAM" on to the surface to help keep the paint from sticking. In the end, I think that this will look good and hey, it's just yet another excuse to have something custom and a little less stock.


Other than that, I've pulled the mini me model out of my own van as I need to update it's paint job ;)


That's it for now, more pics to come.


Keep on Truckn!!


Monday, October 20, 2008

Keeping it trim.............

Howdie folks!


In this posting: New chrome trim, Destruction Derby, and coming soon -- new van to do!!


Sorry it's been a while since my last post, I didn't have my camera for a while. I don't like to post without pics.......you just need that eye candy, especially all you chevy vanners needing their fix. I know I'm guilty of it; some people look at porn on the net while others, like myself, look at van porn. My girlfriend has caught me many a times, late night she walks in and says: "what are you doing?" , I say "nothing".......she says, "looking at van porn?" and I say: "yup".......and I love it, I can't get enough of it. Those sexy, spoilers, those flare kits, that all around 'bad ass' look........but I got to say, my turn off is shag, too stereotypical.

~~~~~

Yup, the more I do on my van, the more addicted I truly feel, needing more vans to get out all of the ideas that I have. Sometimes I figure I should just get model kits and release my van demons that way but then I never get around to it. Sometimes I go on to http://www.ebay.com/ and I search things like "chevy van" and I feel stuck until I get through every listing there is........

Other times I google "custom van" just to see what I can find. Then there's the famous google search for "chevy van kijiji" just to see what http://www.kijiji.ca/ has to offer.......the forbidden fruit if you will. This is actually how I found my buddy his new 1993 G10 Chevy van that we just went to pick up together 6 hours away but more on that in a later post; I'm a little behind in my posts and I need to catch up....but really, it is 99.5% rust free and has 130,000 original kms on it, get ready for it, oh yeah, you know what I'm talking about ;)


So, first thing first, I happened to be in Canadian Tire, as I usually am, and I found this stick on chrome trim stuff for $15.99. As soon as I saw it, I knew where it had to go......it was like destiny. The image of each oval on my tail light covers, chromed with trim flashed through my head like lightning hitting the waters during some wacko, intense storm. Needless to say, I bought this stuff and went to work with it. I did the tail lights first and figured that any left over was a bonus. Well, in the end, I had enough to do the tail lights, the marker lights and my dash which has really spruced things up. The key with this stuff is to pre-bend it all before applying; it is flexible but it may need some help before you stick it on. It's a little tight around the smaller, circular gauges but it looks way better than before.


Check it out:


This stuff is well worth the money. It came with a good amount and was easy to work with. Just make sure your surface is clean before you stick to it.

Anyone wondering, those green switches control the lights on the downspoiler while the other will shut the interior lights off when the door is open, as to not drain the battery. When I'm working on the van with the doors open all day long, I don't like to have the lights on so this switch takes care of that.


------


Yesterday, my G-friend and I went out to Rockland, Ontario for the fourth annual destructive derby.
What is better than a bunch of custom vehicles smashing in to eachother until they can't anymore?
It was awesome and I hadn't been to one since I was 13.....too long. I will go to one every chance I have. Here are some pics and a vid which is bad quality, sorry, it's all I got.


I still intend on doing a video tour of my van but I need to sort out a better camera to do it with so stay tuned for that.

*Also, WANTED: My buddy is looking for a mud style flare kit and a downspoiler for a '93 G10 chevy van. The price for them new is insane and completely unreasonable. Do you have some that you'd like to sell???? Even if they're a little beat up, we may buy them for the right low, low price and then put the work into restoring them. Contact me: didgeman.ca@gmail.com

Ok guys, that's it for now. Plenty more to come, I promise.

Shout out to my KW pals, I'm missing yo' sexy butts.......... ;)


Tuesday, October 7, 2008

TA-DAH!!!!


Ok all, here it is in all its glory.  For an $89 paint job and an enjoyable time to do it, I'm very happy with it.
I really wanted to do a video for this posting but I was having problems with the camera. The next blog update will be a video tour of my van, inside and out.
Here are a bunch of pictures:


Oh baby!!  Check out the street glow!!  
SO, I know, underlights are totally 'fast and furious' cheesy but they do look cool.  I bought these years ago off of ebay and having used them on two different past vehicles, it would be a shame to leave them in a box collecting dust on the shelf. 


Next posting is a video tour,  stay tuned............................


Monday, September 29, 2008

The Eagle has landed..............

Above: the hood ornament is in place. It had no eyes so I stuck in some diamond earing studs for a little 'bling bling'.


Howdy all!!
The van is looking pretty sweet!!  The hood ornament is on, the flares are on, the stripes are done, the emblems are in place and the van is all waxed up. All I need to do now is to install the underlights.
Maybe I'll make a video for the official presentation of the finished product.
Here are some shots of the process:

Above and below:  Masking and painting the stripes. I used glossy white Tremclad spray.


Below:  A glimpse of the paint surface....it's got some nice shine to it ;)


Below:  The emblems are on, these are the old school emblems.


Okay.....so, next update will feature a video and pics of the van all finished!!

Keep on Truckn'!!!!

:)


Friday, September 19, 2008

Getting down with the spoiler..............


Greetings all!


The down spoiler is attached and the lights are wired up and are very bright. I never thought I'd have a downspoiler on my van but one came along and I couldn't say no.


I've put yet another coat of paint on so now, I have one more application to do (two coats). After that's done, I'm going to put on the racing stripe. I still have two flares to rebuild and then I will install those, I can't wait.


That's it for now........short and sweet, just like my van ;)


Keep on truck'n


:)


Wednesday, September 17, 2008

I've got a flare for blue..................


Howdy all!!   
I'm back again, sorry I've been away for a bit, working on the van's paint job and the flares.  
I've started the paint job and I've done 3 applications. Each application is 2 coats followed by a wet sanding when it's dry.

The weather has been total crap so the whole thing has been slower than I had planned but you absolutely can't rush this part.

I've been re-building the flares which has been long but it will be well worth it. They are the mud style flares and will really give the van a beefy look ;)     I still have two to finish.
I've attached some fog lights to the down spoiler which is yet to be installed, maybe I'll get it on tomorrow between applications.  

Here are some pics of it all:

Right: Two coats

Above: after 3 coats.


Above: The flares getting re-built


Above:  This is the style of stripe that I'm going to put on the van only it will be wider than this one. 


*


I've chosen the wider stripe because it will work best with the hood ornament but more on that later ;)  ....................


*


I've got a few days of good weather so lots of painting will get done.  After all coats are applied, the van will have to be left alone for a week to let the paint totally harden up.  Because the coats are so thin, the paint dries very quickly but you should give it time anyways.  
After the drying period, then next step is to sand with 1000-1500 grit and then to buff with compound and then to wax it all up.

Stay tuned...............